Word to the wise: Do not break this windshield. No! Don't do it!
I just got word back from the shop: $914 for the glass with shipping. Another $250 to put it in. Compare that to the normal automotive windshield that is usually $300 or so installed.
I hit a low-hanging branch a couple months back. I wasn't going that fast when I hit it, but there was a previous chip in the glass that is probably the starting point for the failure - the break lines run right through the chip.
Save your upper front windshield...
-
skater

- Site Admin
- Posts: 2571
- Joined: Thu Mar 08, 2007 1:00 am
- B190 Year: 1991
- WBCCI: 13270
- Location: Annapolis, MD
Save your upper front windshield...
1991 Airstream B190 - bought, 2005; sold, 2011; bought 2017
1995 Airstream Excella 30' trailer
WBCCI #13270, Washington, DC Unit
1995 Airstream Excella 30' trailer
WBCCI #13270, Washington, DC Unit
-
Alaskan

- Site Admin
- Posts: 814
- Joined: Wed Mar 21, 2007 12:00 am
- B190 Year: 1999
- WBCCI: 0
- Location: Alaska and Washington
It was very very easy to install...took me about an hour
Purchased one from Airstream 10/2007 Edit: $269.00 plus UPS Ground shipping at $52.98 and there was a $35 charge for the wood box it came....
Update 1/22/2010 the current retail price on that glass is now $495.00
Looking at my notes, I called Airstream Parts (937-596-6111 ext #7401)..they asked for the last 4 numbers in the Airstream Serial number from the rig, which really didn't matter as all these front windows were the same in the B190's
After telling me it was available they directed to a dealer (Great American RV, contact Roy in Parts 888-926-2626) telling me that after purchasing the window it would ship direct to me from Airstream in Jackson Center, Ohio
Great American took the order, charged my card and the glass was drop-shipped directly to me from Airstream within a couple weeks
Looking at the Packing Sheet:
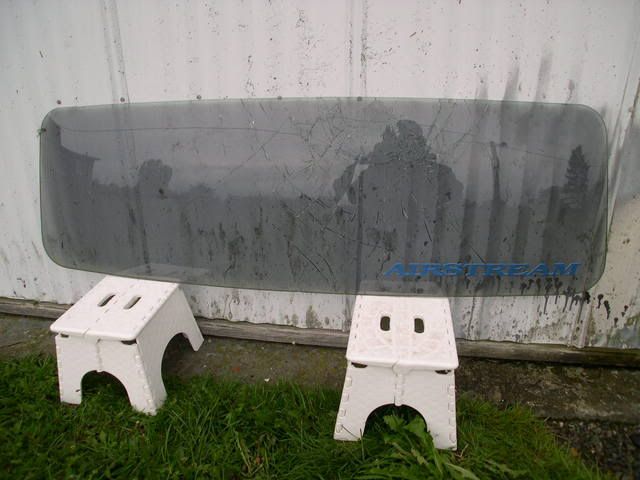
Item Number: 195329-167 (front window)
Description: Window, front-bedroom-190 M. H.
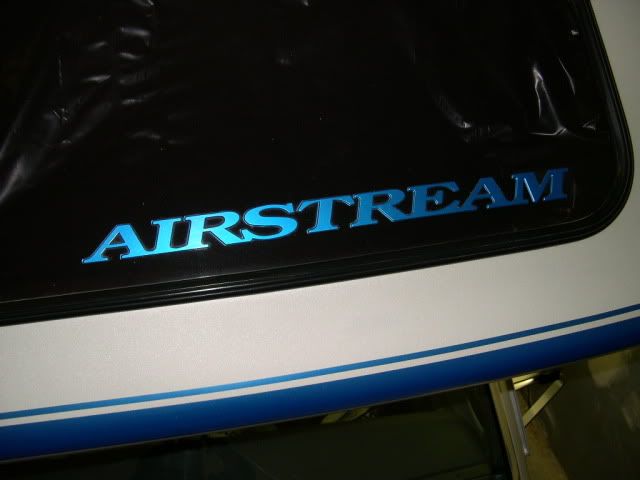
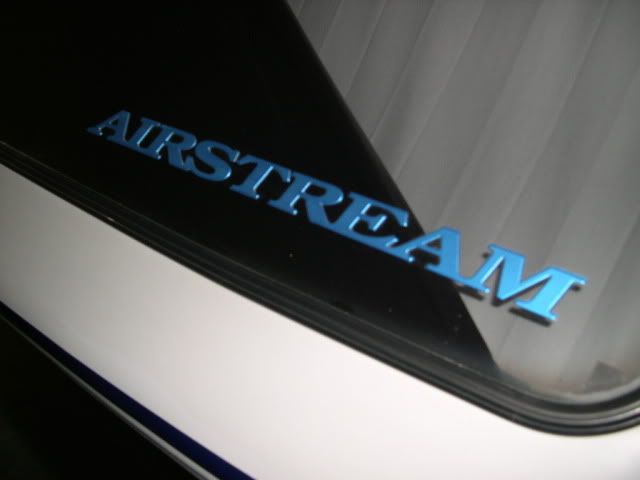
I also ordered the thick vinyl Airstream logo that you'll see in the lower RH corner:
Item Number: 195329-308 (airstream laser-cut decal) ($30.00)
Description: 5.593375 Bottom Laser Rocker
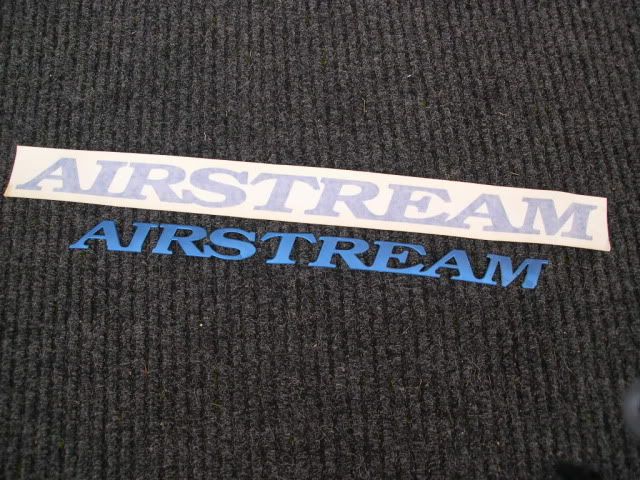
Might be able to very carefully remove that with a little heat from either hot water or heat-gun...as its pretty costly
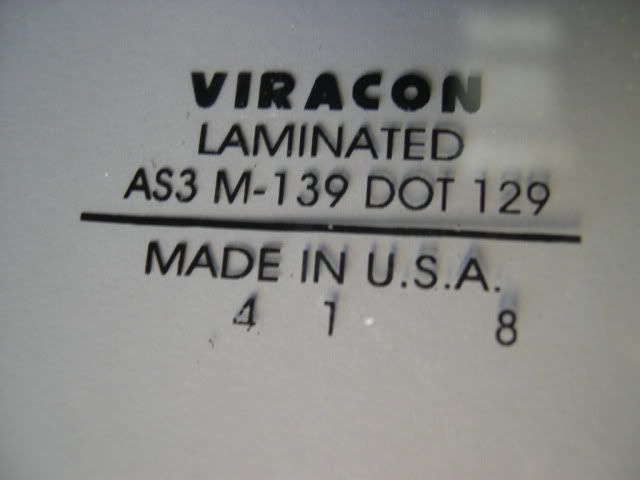
This decal was on the glass....I suspect this is the company thats actually manufacturers the window for Airstream...
VIRACON
800 Park Dr
Owatonna, MN,
55060-4935
800-533-2080
Purchased one from Airstream 10/2007 Edit: $269.00 plus UPS Ground shipping at $52.98 and there was a $35 charge for the wood box it came....
Update 1/22/2010 the current retail price on that glass is now $495.00
Looking at my notes, I called Airstream Parts (937-596-6111 ext #7401)..they asked for the last 4 numbers in the Airstream Serial number from the rig, which really didn't matter as all these front windows were the same in the B190's
After telling me it was available they directed to a dealer (Great American RV, contact Roy in Parts 888-926-2626) telling me that after purchasing the window it would ship direct to me from Airstream in Jackson Center, Ohio
Great American took the order, charged my card and the glass was drop-shipped directly to me from Airstream within a couple weeks
Looking at the Packing Sheet:
Item Number: 195329-167 (front window)
Description: Window, front-bedroom-190 M. H.
I also ordered the thick vinyl Airstream logo that you'll see in the lower RH corner:
Item Number: 195329-308 (airstream laser-cut decal) ($30.00)
Description: 5.593375 Bottom Laser Rocker
Might be able to very carefully remove that with a little heat from either hot water or heat-gun...as its pretty costly
This decal was on the glass....I suspect this is the company thats actually manufacturers the window for Airstream...
VIRACON
800 Park Dr
Owatonna, MN,
55060-4935
800-533-2080

Front window
Alaskan,
I admire your intrepid attitude. Inasmuch as I have a crack in my front window, would you care to share a few comments on the technique of replacing it by oneself. Thanks. Seawolf
I admire your intrepid attitude. Inasmuch as I have a crack in my front window, would you care to share a few comments on the technique of replacing it by oneself. Thanks. Seawolf
-
Alaskan
- Site Admin
- Posts: 814
- Joined: Wed Mar 21, 2007 12:00 am
- B190 Year: 1999
- WBCCI: 0
- Location: Alaska and Washington
First off...
My installation was made somewhat easier due to the fact that I have, in my shop, a single-stage of scaffold with casters.
If you could safely place a step-ladder on each side with a plank across, secured, that would make your installation easier
As it turned out, the scaffold was just wide enough to fit past the front fenders so I was able to roll it right up to the lower windshield so I had a perfect platform to work off of at a position to be at the correct height to work on that upper windshield...
Next...look at the first picture above, you will see a "bead" in the center of the window rubber...that is a separate piece of rubber that is installed to tighten the rubber.....find the end, usually placed bottom center....work the end out and simply pull it out all the way around the window...it comes out very easily...
Once that has been removed you can put a little pressure on an inside corner of the glass and it will move out of the rubber....once that has started, finish the removal on the outside. That piece of glass is safety glass so its pretty tough. even if cracked. safely glass consists of two sections of glass with a clear vinyl in between
The one I replaced was severely damaged but it came out very easily, all in one piece..
Clean the rubber, in the grove where the glass fits into it...
Now, to make the installation a little easier you can put some liquid dish soap in that grove..
Set the new glass into the bottom of the rubber, make sure its centered side-to-side, and work it into the rubber from the center outward, up the side and across the top...if you need any tools to help you accomplish that, use wood like a paint stir-stick
Next....take that rubber bead material and put a center-mark on it....find the center of the window at top and start installing that piece at center and work it in both direction a little at a time...you can again use some dish soap to make the easier.....I used a couple small flat-tip screwdrivers, carefully to work that rubber back in
Be patient, take you time...work a little on one side then jump over and work a little on the other side
This was taken in Ketchikan at the Alaska Ferry Terminal....

Little better picture of the rubber bead in the center of the rubber molding
She had a local body shop in Anchorage shrink-wrap the front of her rig with a clear vinyl to prevent the water from getting in...
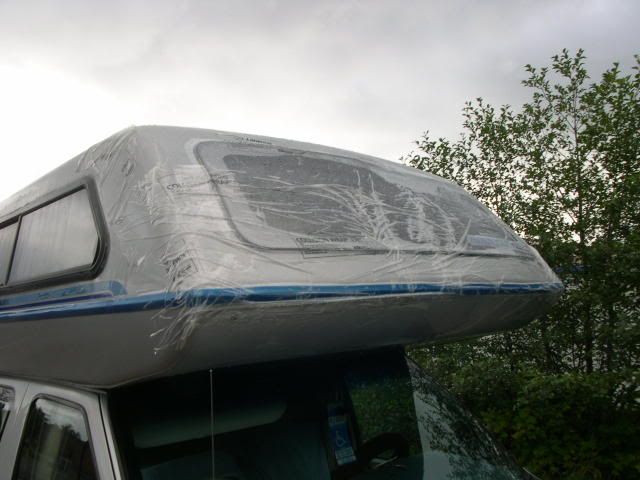
This is the glass I took out, well smashed just to the right of center near the top. The story was she pulled into her favorite hamburger place in Anchorage and the building moved as she got closer..
My installation was made somewhat easier due to the fact that I have, in my shop, a single-stage of scaffold with casters.
If you could safely place a step-ladder on each side with a plank across, secured, that would make your installation easier
As it turned out, the scaffold was just wide enough to fit past the front fenders so I was able to roll it right up to the lower windshield so I had a perfect platform to work off of at a position to be at the correct height to work on that upper windshield...
Next...look at the first picture above, you will see a "bead" in the center of the window rubber...that is a separate piece of rubber that is installed to tighten the rubber.....find the end, usually placed bottom center....work the end out and simply pull it out all the way around the window...it comes out very easily...
Once that has been removed you can put a little pressure on an inside corner of the glass and it will move out of the rubber....once that has started, finish the removal on the outside. That piece of glass is safety glass so its pretty tough. even if cracked. safely glass consists of two sections of glass with a clear vinyl in between
The one I replaced was severely damaged but it came out very easily, all in one piece..
Clean the rubber, in the grove where the glass fits into it...
Now, to make the installation a little easier you can put some liquid dish soap in that grove..
Set the new glass into the bottom of the rubber, make sure its centered side-to-side, and work it into the rubber from the center outward, up the side and across the top...if you need any tools to help you accomplish that, use wood like a paint stir-stick
Next....take that rubber bead material and put a center-mark on it....find the center of the window at top and start installing that piece at center and work it in both direction a little at a time...you can again use some dish soap to make the easier.....I used a couple small flat-tip screwdrivers, carefully to work that rubber back in
Be patient, take you time...work a little on one side then jump over and work a little on the other side
This was taken in Ketchikan at the Alaska Ferry Terminal....
Little better picture of the rubber bead in the center of the rubber molding
She had a local body shop in Anchorage shrink-wrap the front of her rig with a clear vinyl to prevent the water from getting in...
This is the glass I took out, well smashed just to the right of center near the top. The story was she pulled into her favorite hamburger place in Anchorage and the building moved as she got closer..
Last edited by Alaskan on Fri Feb 05, 2010 12:50 pm, edited 1 time in total.
-
Alaskan
- Site Admin
- Posts: 814
- Joined: Wed Mar 21, 2007 12:00 am
- B190 Year: 1999
- WBCCI: 0
- Location: Alaska and Washington
And...being a stubborn ole Alaskan age 81 I've learned not to question what she tells me too much
The hamburger place had some kind of canopy and she wasn't paying close enough attention is what really took place...
The hamburger place had some kind of canopy and she wasn't paying close enough attention is what really took place...
Last edited by Alaskan on Sat Feb 06, 2010 3:00 am, edited 1 time in total.
Front window
Thank you for the lucid and very helpful installation instructions. I'm not sure I can easily come up with suitable scaffolding but I would not hesitate to undertake the task after your description of the process.
-
Alaskan
- Site Admin
- Posts: 814
- Joined: Wed Mar 21, 2007 12:00 am
- B190 Year: 1999
- WBCCI: 0
- Location: Alaska and Washington
Take some time and think about it while the glass is making it way to you....you might come up with an idea for getting you up to the position to do that installation
I suspect a glass shop that would be willing to take that job would have a way to work similar to what I did....it would be very difficult to attempt to do that off ladders....
Don't let anyone stand on your hood of get on-top-of your rig to do that...ya never know now days
I suspect a glass shop that would be willing to take that job would have a way to work similar to what I did....it would be very difficult to attempt to do that off ladders....
Don't let anyone stand on your hood of get on-top-of your rig to do that...ya never know now days
Installed my cabover window today, basically using the method described above by Alaskan. Removing the old window was a snap, took less than 10 minutes. Getting the new window back in the rubber channel was the hardest part of the job. I set the window in the bottom channel first, carefully worked in the bottom corners and then alternated from side to side working 4 or 5 inches at a time into the channel. Detergent loaded water in a little spray bottle was very helpful as a lubricant. Popsicle sticks (or tongue depressors) in addition to paint stirrers as suggested by Alaskan were helpful. When I got to the top edge, what I had achieved had increased the pressure of the glass against the outside top surface of the rubber channel. I found a 1 1/2 inch putty knife helpful (with lube) between the top edge of the glass and the top of the rubber channel to pry the rubber upward while pressing somewhat gingerly against the glass in the same area to force it down into the channel.
Replacing the center rubber strip was easy but tedious. I started out using a small screwdriver to press in about a 1/4 inch at a time. Then, sort of by accident , I found that by inserting the corner of the putty knife into the top or bottom of the lubricated slot and sliding the knife while pressing against the center strip I could work 5 or 6 inches at a time.
The whole project took me about an hour and a half, including a temporary scaffold -- two eight foot ladders clamped to the fenders at the wheel wells and an eight foot 2 X 12 across and above the hood. The point of my story is that just about any home handyman type can perform this task. The current (Feb 2010) price of the glass from Airstream was $462.93.

-
Alaskan
- Site Admin
- Posts: 814
- Joined: Wed Mar 21, 2007 12:00 am
- B190 Year: 1999
- WBCCI: 0
- Location: Alaska and Washington
IMO its a poor replacement....less costly but it won't be right and may leak along the vertical sides..
Please let us know how the installation turns out and if you are satisfied....
Be sure to have them water test for leaks.. !
Problem I see with that is the original glass in a compound-curve and your plexi will not be, as it starts as flat material....therefore I question whether it will fit properly, vertically....there won't be a slight curve
"Shatterproof plexi is commonly referred to as Lexan...
How thick is the material...???